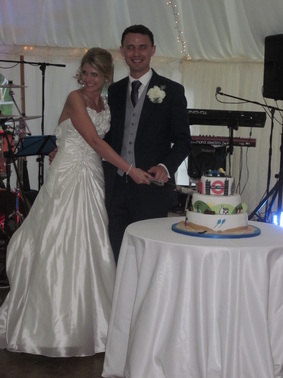
 It was my good friend Jen's wedding yesterday. It was a lovely day and they both looked so happy. The wedding cake was very symbolic of their lives together. The bottom tier was the Cornwall beach where Kelvin grew up. The middle tier featured the rolling Buckinghamshire hills of Jen's childhood and the top tier was London themed symbolising their lives together now living in London. The topper on the cake was the two of them driving off from the church just as they had sone a few hours earlier. Jen's friend Sarah made the cake and i had a slice of the lemon tier and it tasted delicious. Congratulations Jen & Kelvin! 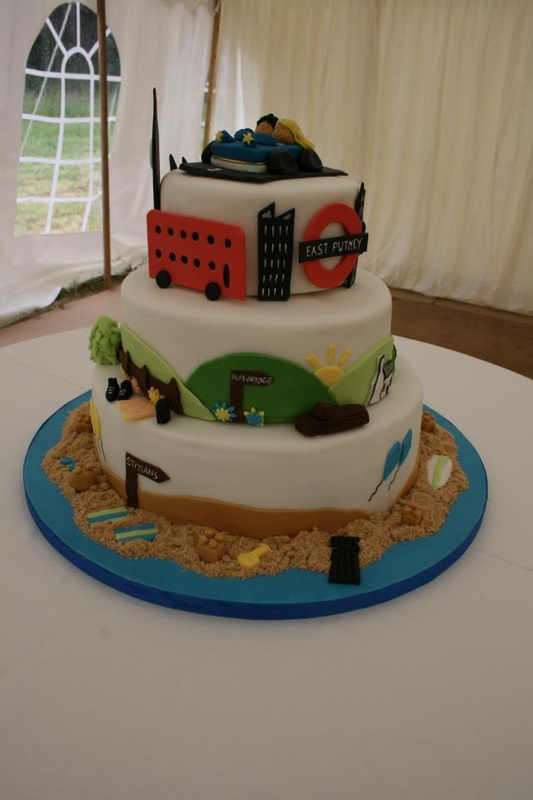
0 Comments
I have had a query on an old post about how i colour my buttercream icing, so i thought i would tell you all about the Sugarflair food colouring pastes i use. These pastes are much much thicker than the liquid food colouring you buy in the supermarket, about as thick as toothpaste. You add them to your buttercream using a toothpick and slowly adding it a small amount at a time until you build up the colour you want. You can mix colours to create the exact tone you need. If you are colouring red or black you can buy Black extra or Red extra which are concentrated so you don't have to use as much to get intense colour. I find it works really well for buttercream and you can colour large amounts really easily. But if you are colouring fondant with a very deep colour i recommend you buy ready coloured fondant or use a powdered pigment colour as the paste tends to make the fondant wet and sticky if you use too much. 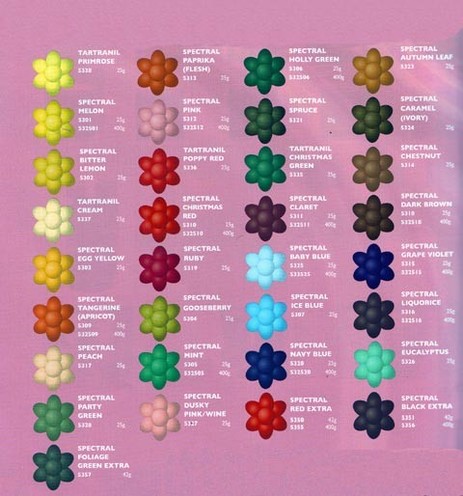 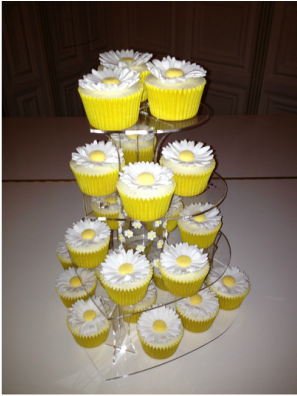 Back from our second wedding of the year. This one was in Suffolk at a beautiful venue called Hengrave Hall.
The wedding colours were yellow and white and the room was beautifully decorated with daisy and gerbera flowers inside bird cages. The cake was made by Aunt of the bride, Pauline (who also made my wedding cake) It was a white 2 tier cake with small daisies around the tier and a comical topper but what really caught my attention was these beautiful daisy cupcakes. The giant handmade daisy sugarpaste toppers looked stunning and i was so impressed with how bright and yellow the papercases stayed - no signs of oil seeping through or discolouration! The cakes were presented on a perspex stand on top of a white grand piano! In the beautifully decorated room they looked stunning. 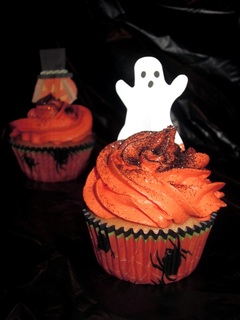 I had 2 Halloween parties to go to this year. The first was my friend Laura's 30th do and the second was my in-laws halloween party. Not wanting to disappoint i decided to make some cupcakes. I decided to go for vanilla cupcakes with a blood (aka jam) core. I found these really cute cupcake cases and cutout decorations in Waitrose but nearly passed out when i got home and realised they had cost me £15.00! Luckily there was 2 dozen so enough for both parties. For the first party i went for orange vanilla icing and black sparkly glitter. They looked really fun. 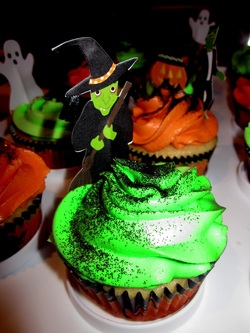 For the second party i decided to add another colour to the mix and opted for a lurid luminous green picking up on the green edging stripe on the cupcake cases.
The green cupcakes were iced lemon flavoured and the orange ones were iced vanilla flavour The black glitter really popped off the green and added an extra dimension to the overall effect. Next year i think i'll try some royal icing cobwebs - if i ever get round to learning how to do royal icing!!! My baby daughter Eloise was christened a couple of weeks ago and i had saved a fruit tier of our wedding cake to re-ice as her christening cake. I re-iced the cake with 2 layers of marzipan and white icing. I then embossed a rocking horse around the base with a patchwork cutter and dusted with pink petal dust to highlight the design. I then added cut out icing flowers between the horses and topped the cake with 3 handmade building bricks decorated in icing designs such as flowers, bunny rabbits and butteflies. For a personal touch i included my daughters, husbands and my own initals (E C A) on the bricks. To finish the display i baked 100 vanilla sponge cupcakes in bright pink striped cases and topped with a rich vanilla buttercream icing. The decorations on the cupcakes were made from icing and refelcted the designs on the building bricks. A shimmer of edible glitter finished the look. It was a great day and all the cakes were gobbled up. Big thank you to my Uncle Stu who took some fab pictures of the cakes! 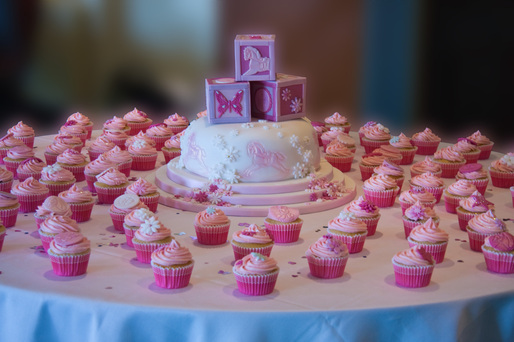 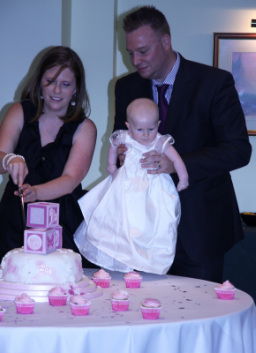 I am expecting my first baby and my sisters in law organised a babyshower for me! My friend Yang Mei made these fantastic baby shower cupcakes - aren't they wonderful! 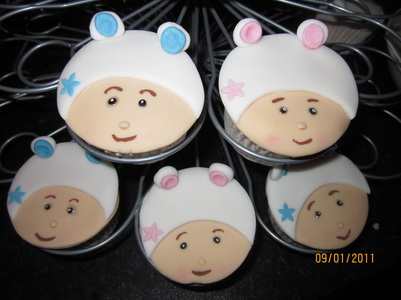 Last week saw my husband's little sister turn 21. She asked for a fantasy cake and after looking at loads of designs we decided to go for our own star burst theme in red, white and black. 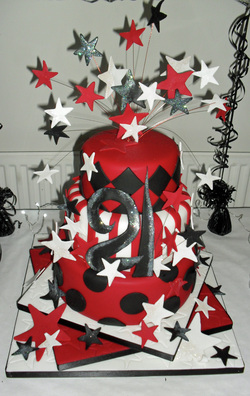 Because we didn't need a huge amount of cake, i used a dummy for the bottom tier which meant i could decorate well in advance. I created a raised tiered base by layering different coloured iced square boards at different angles. Each board had stars embossed into the icing. The tiers was then decorated with red, white and black fondant icing (Thanks Chris for mixing all the red for me!) in a variety of different patterned designs. The top 2 edible tiers were lemon flavoured sponge with buttercream filling. A stylised icing 21 was added to the middle tier and icing stars cascaded from the wired topper and tumbled down the cake to the base. Black ribbon edging to the boards and a fair amount of edible holographic glitter finished the look.  Sharing Victoria's bash was Aussie relative Lea who turned 50 the same week. As a surprise for the birthday girl i created a single tier vanilla sponge cake with jam and buttercream filling. The decoration was themed around black and white flowers with purple glitter detail. The base and sides featured embossed flowers and layered cut outs created using daisy and petal cutters. Some flowers were given contrasting centres using daisy centre molds. To finish the design a '50' was created out of cut out flowers and applied to the top of the cake. Black ribbon edging created a slick contrasting edge to the board. The party went off without a hitch and despite the cakes not actually being cut on the night, they were a big hit. Mariata is this website's biggest fan. So when she asked me to make her an indulgent chocolate cake for one i thought it would be fun to include a step by step guide to the cake making process on the blog 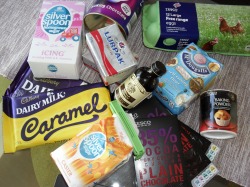 These are the ingredients used in the cake. To start i creamed together the unsalted butter and the caster sugar. I then beat in 2 eggs and a drop of the vanilla essence. I sifted the flour and baking powder and slowly added to the mixture alternating with milk. When everything was added i beat for a few minutes until smooth. 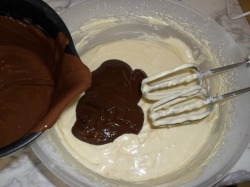 I set the mixture aside and melted milk and dark chocolate in the microwave on a low heat. When cool i beat the chocolate into the basic cake mixture slowly. To finish i added a couple of heaped teaspoons of cocoa powder and thoroughly beat everything together 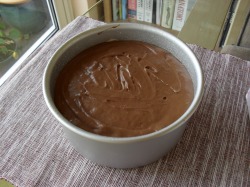 I lined a 6inch with baking paper and poured in the mixture. I leveled the mixture using a palette knife The cake was then cooked a pre-heated oven for about 50 minutes on gas mark 6 I removed the cake from the oven and left for 10 minutes before turning out onto a cooling rack. 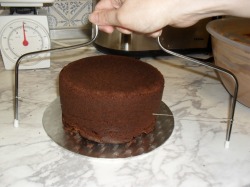 When the cake was completely cool i transferred onto a cake base and used a cake divider (which has an adjustable wire which cuts the cake at even intervals) to divide the cake in two. The bottom of the cake becomes the top giving a flat surface for decoration. 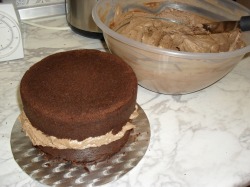 To make the icing i melted caramel chocolate and a bar of milk chocolate in the microwave and set aside to cool. I beat unsalted butter until fluffy. Slowly i added icing sugar, beating until a fluffy paste was formed. I slowly added the melted chocolate caramel mixture until the icing became stiff but light. Using a palette knife i spread the mixture between the two halves of the cake. 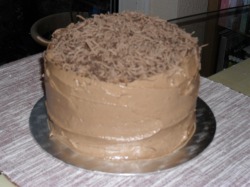 The remaining icing was applied to the whole cake covering the top and sides leaving with a rough 'iced' texture.
To decorate the top i grated the remaining dark and milk chocolate and sprinkled over the top of the cake. Enjoy Mariata! We went to a garden party wedding last Sunday in France and the wedding cake was cupcakes! My favourite! The Mother of the Groom, Pauline, made an amazing selection which were decorated with mini flowers, butterflies and glitter in foil cases. The chocolate and vanilla sponges were arranged on cake stands and the relaxed, pretty, summery style fit the garden party wedding perfectly. The cutting cake on top was gluten free for the bride! There was also a mini Croquembouche, which is the French traditionally wedding cake made from filled choux buns stacked in a pyramid and held together with caramel sauce. Traditionally, the top of the croquembouche would be hit with a sword, silver mallet or even a champagne bottle, cracking the top off while the bridesmaids hold up the corners of the table cloth to catch the pieces. I had 2 cupcakes and a piece of croquembouche and it was all tres bien! 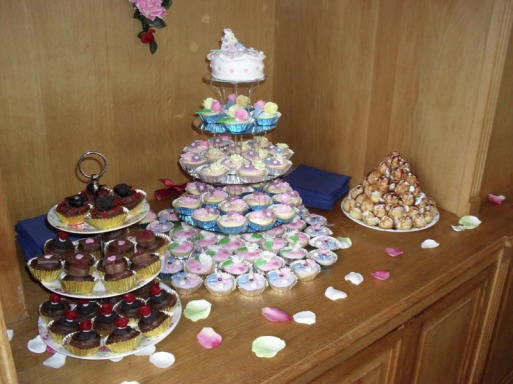 |
About AmyMum. Wife. Artist. Baker. Archives
November 2013
Categories
All
 |
 RSS Feed
